
A work in Progress


There are fabulous macaron sites out on the blogosphere. You only have to do a search on 'macaron' to find a multitude of information.
Some of my favourite sites are: Audax Artifex; Mercotte; Mélanger; Mowielicious; Syrup and Tang; Tartlette; Trissalicious; For fantastic information, visit Bravetart1 & Bravetart2 (added 16-08-11). Great tips and info on problems including hollow macarons (macawrongs).
Granted, they're not the easiest thing to master, but if you are prepared to experiment a little, use a little trial and error, a little patience and persistence, you will eventually make the most delightful little macarons. In the process, even if they don't turn out picture perfect, they will still taste fantastic.
Some useful information:
(from information I have compiled off the web in the last 2 years and from my notes that I made from a class that I did at Savour Chocolate & Patisserie School in Melbourne Australia)
Almond meal (ground almond)
The almond meal we buy in Australia is too wet and has a coarse texture. To achieve the smooth flat tops typically associated with macarons, first dry the almond meal. Leave it out on your bench, covered, for a few days. Alternatively, you can spread it out on a baking tray and place it in the oven at 150˚C (350˚F) for 5 minutes and then cool it down completely. This also helps release the flavour from the nuts. Make sure you keep an eye on it so it doesn’t burn. Other nuts also work perfectly well for macarons, but taste different to almonds. You can substitute any nut flour/meal such as cashews or hazelnuts. You can even add in sesame seeds or poppy seeds.
Tant pour tant (French for half and half)
Tant pour tant is a mixture of equal amounts of almond meal (ground almond) and superfine (castor) or confectioner’s (icing) sugar. It is ground in a food processor into fine granules or powder. The fine sugar helps to grind the nuts and also absorbs the oil from the nuts. Most recipes state, that to get a delicate smooth macaron, sift the almond powder through a fine sieve at least twice. I haven’t found this necessary, as my food processor is quite powerful.
Egg Whites
Egg whites are usually aged out on the bench for 2 to 3 days. Place them in a glass container covered with plastic wrap and cut a small slit in the top of the wrap. This helps them to dehydrate. Alternatively, they can be microwaved for 10 - 20 seconds on medium high, which will give the same results. Egg whites must be at room temperature as they whip and hold better at room temperature. Dried egg white can also be added (2% of the egg white volume) to tighten and stabilize the meringue to give it slightly more holding time but this is optional. This is added at the soft peak stage. Three large egg whites will weigh approximately 100 grams.
Whipping egg white increases the volume and incorporates air. Because of its low surface tension and the stability of the surface, the egg white forms a foam. Start beating slowly, gradually increasing speed.
The stiffness of the meringue can be determined by it’s appearance, the height of peaks and the extent to which the point bends over when the egg beater is lifted out of the meringue, and also how it flows when the bowl is partially inverted.
Soft peak: When slightly whipped, air bubbles are large and the egg white appears foamy, transparent, and very runny. With more beating the bubbles become smaller, the egg white less transparent, whiter and still flows if the bowl is partially inverted.
Slip and streak stage: The egg white has soft peaks and it will hold the shape of a bird’s beak.
Stiff peak: The egg white becomes stiffer as it is beaten and as the air bubbles divide and become smaller. The amount of egg white utilized in forming films is greater. The small air bubbles with fine cell walls are stronger and more rigid than a few large cells. The eggwhite becomes very white, begins to lose a little of the moist, shiny appearance, and is stiff and rigid. When the bowl is inverted, the egg white does not flow and remains in the bowl and the end of peaks stand up straight.
Dry: If the egg is left to stand, the watery fluid collects at the bottom of the bowl more slowly. With longer beating the eggwhite becomes dry, loses its shine and becomes curdled and patchy.
Sugar
Sugar increases the stability of whisked egg white. Either superfine (castor) sugar or confectioner’s (pure icing) sugar is used as the smaller particles assist with aeration. The best amount of sugar is approximately 4 (to 5) tablespoons per egg white.
Stabilising agent
Cream of tartar (an acid salt) is generally used to condition the protein of the egg white and also helps the structure providing tenderness and stability of the foam - 1/8 to 1/4 teaspoon of cream of tartar per egg white is used for this purpose. Lemon juice can also be used (1-1/2 teaspoons).
Colouring
This must not be oil based, as oil will destabilize the egg white. The Intensity will depend on the food coloring used. Concentrated food colouring has more intensity than powdered food colouring. The cooked macarons will be lighter than the uncooked macronage, so don't be shy adding a little more than you think is necessary.
Salt
Some recipes say to add salt. Salt decreases the ability of the egg white to whisk, increases beating time and also decreases stability. It is better to add salt to the dry ingredients if you are adding it.
Humidity
Humidity is the macarons enemy. Don’t make macarons on wet and muggy days.
Types of meringue used in Macarons
There are three methods for whipping egg whites for macarons; the uncooked meringue methods - French and Spanish, and the Italian meringue method using hot sugar syrup. All methods should produce similar macarons. The most important things are learning how to macronner and getting to know your oven.
For small batches, French and Spanish methods are faster and easier.
The French Method
The French method deflates quickly and is too unstable for large batches. This method involves whipping raw egg whites to a simple medium stiff foam (soft peak) then gradually adding castor sugar (1/3 at a time) to tighten and stabilize the meringue (stiff peak stage). You should end up with a glossy meringue that can be turned upside down without falling out of the bowl. The meringue is then mixed with the tant pour tant for the macronage stage as documented below. The texture of the finished macarons is very tender. French macarons are baked at approximately 150˚C.
The Spanish Method
The Spanish method is very similar to the French method except that the macarons are baked at a higher degree (160 to 165˚C) for a shorter time (approx 9 – 10 minutes) and extra confectioner’s (icing) sugar is added and sifted into the almond/sugar mixture (tant pour tant). The extra sugar gives the meringue better structure. The down side is that there is a tendency to get air bubbles in the finished batter.
Italian Method
The Italian meringue method is better for large batches. The egg whites are whisked until the volume is approximately 8 to 10 times the original. It is then combined with a hot sugar syrup. The meringue is more stable and gives more consistent results than the French or Spanish methods. There is more scope for playing with the batter. You can divide the batter and add different colours and flavours. The batter is softer and shinier and you don't have to dry the piped macarons as long. It may seem a little difficult at first, as the meringue and the sugar syrup must be ready at the same time, but it really is very easy once you have tried it and well worth the effort. Italian macarons are baked at approximately 150˚C.
Italian Method
(I prefer this method and have not had a failure yet)
Preparing the Hot Syrup for the Italian method
Get the hot syrup organized first. You will need to use a candy thermometer. The sugar and water are combined in a small pan then stirred continuously with a wooden spoon over medium heat until the sugar is dissolved. It is then brought to the boil. It isn’t stirred once it has come to the boil. The heat is reduced to medium and the sides of pan brushed down with a clean, wet pastry brush. This is to remove sugar crystals and prevent grain forming. When the syrup reaches 115˚C (soft ball stage), start mixing the egg whites using a medium speed.
The meringue
The egg whites are whisked until they appear foamy, then cream of tartar is added. Then it is whisked further until they reach the slip and streak stage and the volume is approximately 8 to ten 10 the original. It is important not to overbeat at this stage. Use a medium to medium-high speed to get a stable foam with uniformed sized air bubbles (speed 6 on Kitchen Aide). A small pinch of dried egg white can be added at this stage to tighten and stabilize the meringue.
Adding the Hot Syrup
When the sugar syrup reaches 118˚C, it is removed from the stove and immediately poured down the side of the mixing bowl into the whipping egg whites. Recipes I have read vary from 118 to 121˚C, so don’t worry to much if it goes over a little. Be careful not to get it on the whisk, causing splattering and possible burns.

The volume of the whipped egg whites visibly increases. Colour is now also mixed in. Mixing is continued at medium speed until the mixing bowl is cool to the touch and the meringue has thickened and reached a workable temperature of around 35˚C.
Adding the tant pour tant
Before folding with the meringue, the dry ingredients (tant pour tant) are first mixed with a small portion of raw egg whites in a separate bowl to form a relatively firm paste. This is continuously mixed with a whisk so it doesn’t ball.
How to ‘Macaronner’
(or mixing the tant pour tant and the meringue) - this technique is used for the Italian, Spanish and French methods.
The meringue is transferred to a large flat mixing bowl for the Macaronage stage. This is the most critical stage in mixing. The batter has to be mixed to just the right consistency where it is supple and shiny. If the batter is over mixed, too many air bubbles will be deflated. You'll end up with flat, cracked, tough and chewy macarons. Air bubbles are needed to expand with the heat in the oven. This pushes the top of the macaron up to expose the wet part of the batter. If stirred to little, the macarons won't have feet and they will have a peak on their tops.
You will need to do between 40 and 50 turns all up (sliding the spatula under the batter, then lifting and dropping the batter back on itself, always working in one direction and turning the bowl by 1/4 turns at the same time).
Use a spatula to first fold and deflate the batter, mixing the tant pour tant, one-third at a time, into the whipped egg whites. For the first few turns, work fast and be a little robust as you want to knock out some of the air as you mix the meringue and the tant pour tant together (it's different to making meringue for cakes where you have to be delicate). When you have the tant pour tant nearly mixed in (you don't want to knock too much air out either) slow down a little.

As you work the oils from the almonds batter will become looser.
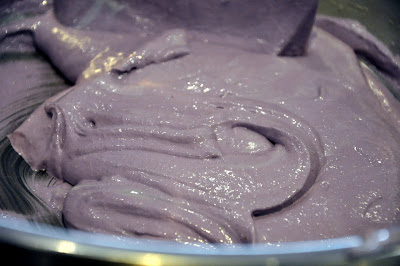
Within a few turns it will change from a dull gritty surface with ridges and lines to a smooth, shiny surface and to what is described as thick flowing magma. In reality, who has seen magma before? This basically means that when you lift and drop the batter back on itself, after waiting for about 30 seconds, the ridges slowly ooze back into the batter.

Your batter is now ready to pipe.
Hint:
If you see peaks after you have piped one whole row, it's not ready. Put it back into the mixing bowl and give it a few more turns. When piped, rap the tray a few times on the bench top to get rid of air bubbles. You can also use a wet finger to flatten out the peaks, but you will have under mixed macarons with possible rough areas on your macarons.
Piping
As the saying goes, practice makes perfect.
Spoon the mixture into the piping bag with a #11 - 1cm (1/2 inch round piping tip). The piping bag can be stood upright in a large jug. Silpat mats are preferable to parchment paper as the macarons are easier to remove. When using parchment paper, you may have to steam them off using a spray mist. If using parchment paper, you can draw 2.5cm rounds with a pencil on one side then use the reverse side.
The tip of the piping bag is held perpendicularly over the sheet to pipe the batter (which should be dropped rather than piped). Pipe batter into 2.5cm rounds across the tray stepping alternate rows diagonally 2.5cm apart. Pipe from the middle with the tip about 1cm (½ inch) above. The rounds will spread somewhat. To finish each macaron, the piping tip is flicked upwards with a twist of the wrist to finish or a reverse C can be used to cut off the batter then moved to the next position. If this is done correctly, there should shouldn’t be a nipple on the top, which will should flatten out relatively quickly.

After piping the first row of macarons, look back at the first one and see if the top has flattened out nicely. If not, scrape the batter up and mix to correct it (if under mixed), or add further tant pour tant (if over mixed) or start again. Even if the macarons are not perfect, they will still taste fabulous. When piping is completed, bang the baking sheets a few times against the bench to remove any air bubbles and even out the piped rounds. For the French and Spanish method, the piped macarons are then left to rest until they form a skin and are dry to the touch - about 20 to 30 minutes or more. Touch to see if they are dry and not sticking to your finger. The heat from the oven causes air bubbles to expand inside the piped batter, which pushes up the top dry skin of the macaron. This in turn reveals the inner wet part of the batter at the base and the formation of the “foot” of the macaron. If they are not dried out sufficiently, the batter will expand outwards and it will crack as it bakes. With the Italian method, the batter dries more quickly and they can be baked straight away (if you are game).
- - - - - - - - - - - - - - - - - -
Baking
Preheat convection oven to 150 - 160˚C or conventional to 160 - 170˚C. This is dependent on the recipe and method used and your oven. Note: But first, get to know your oven. Be prepared to experiment a little, use a little trial and error, a have a little patience and persistence as every oven is different. It will pay off in the long run. Convection ovens take less time and conventional oven take longer. Test your oven for hot spots. I use bottom heat only in my oven as the top heat browns the macarons too quickly. It is a good idea to do a practice run with only a few macarons and experiment with your oven to get it right.
Use an insulated baking tray (special double baking sheets that are ideal for macarons – I found mine in the supermarket and they were relatively cheap $14.95 AUD) or alternatively use two baking sheets (one on top of the other without a gap in between) and lay a piece of parchment or silpat on the doubled baking sheet.
Baking time may vary also. Generally, bake macarons for approximately 12 minutes but timing can be up to 17 minutes depending on your oven type and the size of the macarons. It is very important to keep an eye on the baking progress at the tail end of baking time to adjust as necessary. Open the oven and put your finger on one of the macarons. It should be firm with the slightest amount of give. If it wobbles, they require another minute or so.
Once baked, remove the tray from oven and leave the macarons to cool down on a rack before removing from the mat or paper. Don’t pull them from the paper. They should slide easily off the paper once cooled. If they don't place them in the freezer for a few seconds and they will come off more easily. You can also use a spatula, but be careful as the feet can tear. You can also Spritz with a spray water bottle between the parchment paper and tray. This causes steam and helps to loosen the macarons, but they must not be left for too long or they become too moist.

Finishing off
Pair up similar sized macarons, with one macaron turned face up. Pipe approximately a teaspoon of filling on to the turned up macaron, twist the pair together until filling comes just to the edges of the macarons. Place in a small paper cup cake patty to set.
Storing
Keep the unfilled shells in a container in the fridge and they will be more tender. Macarons can also be frozen either with filling or without. Freezing has a tenderizing effect but at the same time, the shells will be weaker than before being frozen. To defrost, remove the macarons from the freezer and place them in the refrigerator overnight. This minimizes condensation on the shells but also gives them a bit of shininess.
Equipment
large flat mixing bowl
rubber spatula
bowl scrapper
electric mixer or Kitchen Aide
sugar saucepan (cheap nonstick supermaket type works well)
Candy/sugar thermometer
insulated baking sheets - so bottoms of macarons don't burn and you get nice little foot.
For a brilliant book on making macarons 'Les Petits Macarons' - go to this site.
http://www.lespetitsmacarons.com and watch their video on http://www.lespetitsmacarons.com/Video.html
Edited 01-08-2010
If you are looking for the violet flavouring , it comes from a French company:
Sevarome- Z.A La Guide 1 43200, Yssingeaux Z.I. La Guide, France
Tél : +33 4 71 59 04 78
Fax : +33 4 71 65 54 24
Email: info@sevarome.com
Web: Sevarome.com
There is a distributor in Melbourne, Australia:
IMPORT OF FRANCE
Unit 6/38 Thorton Crescent,
Mitcham VIC 3132
AUSTRALIA
Phone: (+61 3) 98723945
Fax: (+61 3) 98740199
Or you can find it in smaller bottles
Cake Deco
Shop 5-7 Port Phillip Arcade
232 Flinders St, Melbourne
Melbourne VIC 3000
AUSTRALIA
Tel.: (+ 61 3) 9654 5335
This is such a fantastic tip sheet. What work went into putting this together. I will have to bookmark it, for sure!
ReplyDeleteGreat tips! When I make macarons again, I'll come here first =D.
ReplyDeleteWow those violet Macarons (I always thought it was macaroons) look incredible.
ReplyDeleteI'm sorry I thought I had already had left a message. Wow the colour and flavour of your macarons are perfection. And your tips are wonderful so clear and easy to understand.
ReplyDeleteI think I will do another batch soon.
Gosh, these look so pretty!! Well done!
ReplyDeleteI wish I had sen this this prior to the Mac challenge! What an impressive wealth of information, and beautiful macs, Bookmarked!
ReplyDeleteOh these look delicious and such great, helpful tips!
ReplyDeleteYummy blog! Congrats on the foodie blogroll!
ReplyDeleteEnjoy!
Fantastic post on macarons!!
ReplyDeleteI know I asked you this in a personal message - but where is your flavouring and what violet flavouring did you use? I couldn't find your "about" page... I want to learn more about you and your story!
ReplyDeleteThanks!
Valerie
these are so beautiful! and useful information!!!
ReplyDeleteHi, Cory... I just now found the wonderful message you left me in my old site answering my questions. I DO have violet flavouring that I did order over the internet - it is not the same brand, but I am sure it will work - and I actually sugar my own violets (under recipes, and in a lide show in my gallery) SO I am thrilled to find these answers. I believe Saturday is the day. I will le you know how it goes!
ReplyDeleteXO
Valerie
Lovely macarons, I just made some violet ones and was having a look on Flickr and came across yours. Your hints were very comprehensive.
ReplyDeleteI thoroughly enjoyed reading your macaron tutorial and tips. Very insightful and a lot of help. I'm obsessed with these treats and I hope to get to the point where I'm a master at making them and/or have developed a sharp macaron-making intuition.
ReplyDeleteI just finished baking some tonight...for the second time at home. They taste great but compared to what I did the other day, I enjoyed former results, simply because they came out closer to being aesthetically ideal. The little feet on today's batches didn't develop as much as I wanted them to.
Practice makes perfect!
Thanks Asymptotic Faery for the comment, the article is here to help macaron makers in their journey. There is so much good information out in the Web now. It is great. Don't worry about the feet, they will come with practice and experimentation. the taste will be there!
ReplyDeleteDoes anyone know why my Macarons always come out hollow!? I must have baked about 50 batches over the past month trying to perfect them. They look great in every other way...but on the inside...AIR!!
ReplyDeleteHi Jo,
ReplyDeleteIt is best to use a convection oven to 150 - 160˚C (300 - 320˚F). Otherwise use a conventional oven at 160 - 170˚C (320 - 340˚F), but make sure you use insulated double baking trays so you don't have too much bottom heat.
Baking at a moderate temperature will help the air bubbles expand, the water to evaporate and the proteins to coagulate at an even rate. If the temperature is too high, the proteins will set too quickly and the water won't have time to evaporate.
Don't forget to bank your trays a few times on the counter before leaving to dry out.
Also, make sure your ground almond isn't too wet. Dry it out in the oven as per my tips and tricks suggestion.
Hope this helps.
Hi,
ReplyDeleteGreat blog you have here! Very informative~
I have a question... how can you tell when the macarons are ready to take out from the oven?
I baked mine at 140˚C for 20mins and they were sticky (when I tried to remove them from the baking sheet, their belly were left behind on the sheet... leaving me an empty shell)...
I think this means they were under baked... but I don't want to over bake them, so how can I tell they are ready?
And can I stick them back into the oven once I got them out (after trying to remove them realising they are now ready)?
And I think mine are extra chewy & sticky for some reason... any suggestion of what might caused this?
(Note: I didn't rotate my trays whilst baking them - does this matter?)
Thanks!
Hi Sophie,
ReplyDeleteThanks for the nice comment. I am not an authority on macarons but I know what works for me. I hope this answers your questions. I personally think you are baking them at too low a temperature but I will talk about that after I answer - how to tell if they are ready.
You can tell when they are ready by opening the oven and putting your finger on one of the macarons. It should be firm with the slightest amount of give. If it wobbles, they require another minute or so - but don't let them brown.
It is so disappointing when their bellies get left behind on the sheet leaving an empty shell - but no, this doesn't necessarily mean they were under cooked.
Yes, you can stick them back in the oven if they are still hot, but 20 minutes is more than enough for them to cook, depending on their size. I'm assuming they are around the 3cm size and not large ones.
First of all, are you using silicone or parchment sheets?
This sometimes happens to me when I use the silicon sheets. Try parchment paper - (I use baking paper - we call it Glad Bake in Australia). Once baked, remove the tray from oven and leave the macarons to cool down on a wire rack before removing from the paper. It is most important that you don't pull then from the paper. They should just slide easily off the paper once cooled, Try turning the paper upside down and peel it away from the macarons. If they don't come away easily, place them in the freezer for a minute of so then they should just peel off.
The traditional method is to spritz with a spray water bottle between the parchment paper and tray while they are still hot. This causes steam and helps to loosen the macarons, but they must not be left for too long or they become too moist.
If they are extra chewy and sticky, you may be cooking them at too low a temperature. Try using a higher heat. I use a convection (fan-forced) oven to 150˚C (300˚F) for the Italian method and 160˚C (320˚F) for the French method. If you don't have fan-forced then use a conventional oven at 160 - 170˚C (320 - 340˚F), but make sure you use insulated double (double) baking trays so you don't have too much bottom heat. It will also depend on your oven. I have a Miele oven which in conventional mode uses bottom heat.
Duncan of "Syrup and Tang" has a great blog on macarons - one particularly on ovens and temperatures for macarons at - http://www.syrupandtang.com/201003/of-ovens-and-baking-and-macarons/.
The extra chewy, sticky texture may also have something to do with the recipe you are using. Duncan also has formulas on his site that may help you with regards to sugar egg white ratios. The ratio of sugar to almond and the amount of egg white used will determine the texture of the macarons. He uses 50 grams egg whites/67 grams powdered sugar/67 grams almond meal. I have personally found that most recipes will work as long as you get the macaronnage technique right.
I don't rotate my trays as they don't turn out as well in my oven, even if I rotate them. I generally only do one tray at a time on the bottom shelf. If you are doing 2 trays at a time, I would rotate them.
I hope this all helps.
Cheers.
Hi Corry,
ReplyDeleteYou've been ever so helpful!!!
I made another batch today and they came out perfect! (well, to my standards anyway)
I think it was due to the low oven temperature and using parchment paper instead of silicon sheet.
You're an angel~ Thanks!!!
Sophie,
ReplyDeleteThats's great. Glas to be of help.
Sometimes they just don't work out even when you do everything the same way. I still have macawrongs from time to time. It's in the lap of the Gods. Just keep doing it and remember! - Macawrongs still taste great and can be just eaten or crumbled over desserts.
Cheers.
this is fantastic! so comprehensive and useful, especially the tip about drying the almond meal. I made my first batch the other day and they were a bit .. bumpy - this explains it!!
ReplyDeleteSusie,
ReplyDeleteThanks for the comment. Congratulations on your first attempt at macarons. The bumps may come from bubbles depending on the mixing method or your ground almond (meal) maybe a little course and need sifting as others have stated.
just linked this article on my facebook account. it’s a very interesting article for all.
ReplyDeleteFreezers Melbourne Australia
French method... omg fail.
ReplyDeleteI tried to make these for my mom for her birthday because she loves them so much... and had to made chocolate truffles instead.
After I order a sugar thermometer online I *may* try the Italian method.
Thanks for trying to help people make these though.
Erin, don't despair. I still have failures from time to time. I'm sure the chocolate truffles were divine! Try doing the Spanish method where you add extra confectioner's sugar (icing sugar). The foam is much more stable. You can find the recipe here at Mélanger - Julia's beautiful blog: (http://melangerbaking.com/2009/03/10/caramel-macarons/). This came originally from the Savour Chocolate and Patisserie school where I also did classes. Another alternative is to find someone who has had several successes and make some with them. It is so much easier when you actually see the technique. Maybe look online at the many excellent videos (try Youtube).
ReplyDeleteCheers,
Corry
This is by far the best detailed recipe for macarons I've seen online. The critical macaronnage steps are well detailed. Nevertheless, I've seen another interesting detail on macaronnage in a video which made a lot of sense as it seemed to give more "guarantee" that the batter be "mixed to just the right consistency where it is supple and shiny" as your stated so clearly:
ReplyDelete- do the folding 40 to 45 times while incorporating all ingredients (tant pour tant);
- use a hard pastry scrapper to slowly press down the batter 12 times (not 10 nor 15) to release excess air and to get the desired smooth, shiny magma surface.
It is said that these specific, precise counts ensure that the right amount of air is kept in the batter.
Hey corry, how much water do i need to use for the syrup?
ReplyDeleteHi Anonymous,
ReplyDeleteThat depends on the recipe you are using: See my blog page
http://bakeitoff.blogspot.com/2009/11/raspberry-macarons-with-raspberry.html
For the syrup in this recipe, I used 75 grams (ml) water to
300 grams castor (superfine) sugar.
That is one quarter water to 3/4 sugar.
Using ingredient amounts as below:
For tant pour tant:
300 grams dried almond meal
300 grams castor (superfine) sugar
110 grams egg white
For the syrup:
300 grams castor (superfine) sugar
75 grams (ml) water
For the meringue:
110 grams egg white
3 grams dried egg white
pinch of cream of tat tar
a few drops of red colouring (don't be shy)
Hope this helps.
very detailed ...very good job :)
ReplyDeleteI have been making this little bugger every week now
Hi,
ReplyDeleteI made macarons using italian method.I baked using fan-forced oven with bottom heat for 17 minutes at 130 deg C.They have nice feetn top and bottom are cooked but the innards are wet and too moist and they are not chewy at all. Do you have any ideas what went wrong? Thanks!
Hi Melly, Your temperature is too low. You should have your fan forced oven on 150 - 160˚C. As above in my blurb:
ReplyDeleteBaking
Preheat convection oven to 150 - 160˚C or conventional to 160 - 170˚C. This is dependent on the recipe and method used and your oven. Note: But first, get to know your oven. Be prepared to experiment a little, use a little trial and error, a have a little patience and persistence as every oven is different. It will pay off in the long run. Convection ovens take less time and conventional oven take longer.
Also read information from this blog:
http://bravetart.com/blog/MacaronMyths &
http://bravetart.com/blog/TheTenCommandments
Bravetart states:
"Underbaking will result in dramatically hollow macarons. The meringue inside an underbaked macaron hasn’t fully set, so when it’s removed from the oven prematurely, the meringue collapses as it cools, leaving a hollow shell behind.
The macarons in the corner of the sheet pan are easiest to test for doneness. Pick one up and, without removing it from the parchment paper, hold it perpendicular to the sheet pan. Try to peel the parchment away. If it sticks or tears the belly out of the macaron: not done.
Alternately, just break one open. The meringue inside should have a vague dampness about it, but by no means anything gooey."
Hopes this all helps.
Hi Corry,
ReplyDeleteI baked the macarons using a conventional oven with bottom heat at 130 deg C for 17 minutes.
They stood up with feet and the tops were crispy.
When I refrigerate them, they become soft and not chewy.
Any ideas what could be wrong?
Thanks
Melly
Hi Melly,
ReplyDeleteI am not an expert on macarons but I hope this helps. This is what is in my blurb above. "Preheat convection oven to 150 - 160˚C or conventional to 160 - 170˚C" but this is dependent on the recipe and method used and your oven. Be prepared to experiment a little, use a little trial and error, a have a little patience and persistence as every oven is different. It will pay off in the long run. Convection ovens take less time and conventional oven take longer.
If your macarons are soft after refrigerating them, it may be your filling. I have found that a more fluid filling like lemon curd/butter or raspberry jam will make them soft. Ganache is better. If they are not filled it may be your recipe ratios causing the softness.
As also mentioned above, Duncan of "Syrup and Tang" has a great blog on macarons - on ratio formulas and particularly on ovens and temperatures for macarons at - http://www.syrupandtang.com/201003/of-ovens-and-baking-and-macarons/
Duncan formulas are in regards to sugar/egg white/almond ratios and the determination the texture of the macarons. He uses 50 grams egg whites/67 grams powdered sugar/67 grams almond meal.
Good luck with your macs. I haven't been making them for quite a while now.
I first made macarons from a packet mix and found it SO simple! But when I went to make them from scratch they were all soggy, they stuck to the paper, they cracked and just did not work very well at all. After reading your blog I now understand EXACTLY where I went wrong and how to do it properly. Congrats on the fantastic blogpage, and thank you for the advice.
ReplyDeleteHey T.J. Just keep making them and they will eventually work out. How do you rate the purchased macaron mix? I have purchased 2 packets of Donna Hay's macaron mix, but haven't made the effort yet. I haven't been making macaroons of late. Instead, I am on a quest to find the best macaroons in Melbourne (and so far I love the macaroons at "The Tearoom" at the National Gallery of Victoria.
ReplyDeleteHey corry, how much water do i need to use for the syrup?
ReplyDeleteUsed Catering Equipment Melbourne Australia
Hi Mark, for a recipe using 110gm of egg whites, make a syrup with 300g sugar and 75 gm water. Don't stir it after it starts to boil so you don't get grains. See the recipe here for the Italian method using the syrup: http://bakeitoff.blogspot.com.au/2009/11/raspberry-macarons-with-raspberry.html
DeleteAs a professional Pastry Chef, may I offer you two thumbs up for a wonderful tutorial. You are "spot-on"!
ReplyDeleteThank you for your nice comment. It is greatly appreciated.
DeleteCheers.
I pass this tip sheet along to anyone expressing an interest in macaron baking. It's an exceptional guide, and I can't thank you enough for putting it together. It's the best resource of its kind that I've ever encountered. Thank you!
ReplyDeleteThank you Corielle,
DeleteI hope it is helpful to all who aspire to make these wonderful little morsels.
Cheers.
Thank you so much for this guide! I've been reading A LOT of articles and blogposts about macarons these days and this post came as a miracle, to be honest, I kept reading the same things over and over again. You seem to know a lot and I appreciate that you explained each step in detail.
ReplyDeleteMy macarons keep coming out hollow, no matter what I do, I've read on a previous repyl of your here a few tips that might help, but I have one other question I can't seem to find an answer for...my last macarons had a really thick and crunchy crust, when they are supposed to have an eggshell like finish, any ideas on what I did wrong? Here's a picture of the crust (nevermind the hollow shell, hah): http://img.photobucket.com/albums/v92/lulikins/Photo%20Album/Food/MacawrongsC-2_zps50797274.jpg
Hi Luli,
ReplyDeleteThank your for your nice comments. Nice photograph. The shells don’t look too thick to me and I bet they taste divine.
Re: hollow macarons – My previous replies to questions above may help (July 31, 2010 at 5:20 PM) and (October 13, 2011 at 2:46 PM). It is well worth reading Duncan’s excellent blog – “Syrup and Tang”
http://www.syrupandtang.com/200712/la-macaronicite-3-the-more-reliable-macaron-recipe-and-a-few-tips/
It could also be your oven type and where the heat is coming from. See Duncan’s blog - http://www.syrupandtang.com/201003/of-ovens-and-baking-and-macarons/ re: temperatures and ovens and many more of his other great blog pages.
I haven’t put this on my blog before, but I also think piping style may have a lot to do towards hollow macarons: If you hold the tip too high, you may introduce excess air. When you are piping them out, hold the bag perpendicularly over the sheet and don’t hold your piping tip too high (1cm at most - it can actually be touching the batter). The batter should be dropped rather than piped and let it flow rather than forcing it. To finish each macaron, flick the tip upwards with a twist of the wrist to finish. Most importantly - don’t forget those 3 BIG bangs on the bench to get rid of air bubbles before you dry them (if you are dying them – see below).
Re: thick with a crunchy crust.
This will depend on ‘WHEN’ your macarons are thick with a crunchy crust.
There are two things to look at:
1. Are you leaving your shells to form a crust before baking?
If so, leaving them for too long may result in a thicker crunchier shell. It is not necessary to leave them to dry out for long, especially with the Italian method. I have experimented with different drying times and also not leaving them to dry at all - with mostly success for all methods with differences only in foot sizes and shininess (I haven’t made macarons in ages so I can’t give you statistics on this). Read Duncan’s blog on “Leaving the shells to crust” - in particular where he recommends letting the shells to sit for only half an hour or so, especially if your oven has strong heat below the baking tray –– and as he says - experiment with only a few macarons at a time.
2. Are you storing you macarons in the fridge or freezer before eating them?
Most importantly and according to Pierre Hermé, macarons are not ready to eat freshly baked. The shell is hard and crisp. They are at their best after being stored in the fridge for 24 to 48 hours then taken out and gradually brought back to room temperature before eating or serving (or freezer – move to the fridge for 24 hours to defrost). There is an osmosis and a synergy of taste that seems to take place between the filling and the shell where it absorbs some humidity from the filling and its insides become tender while the crust on the surface remains intact.
Just as an aside - I tried to make Hazelnut and chocolate macaroons the other day (as opposed to macarons) and they came out more like macarons!!! - Go figure!!!
Don’t take it too seriously. They’re only cookies after all!
Hope this is all helpful and have fun with the macarons.
Cheers,
Corry
Hey Corry!
ReplyDeleteI have bookmarked all of Syrup & Tang's blogposts and I'm going through them.
I pipe my macarons with my bag perpendicular to the parchment paper, I usually squeeze lightly until the shell is big enough, push into the batter just a bit and then upwards (I've tried flicking the tip, but I can't seem to get it right, maybe my piping tip is too big, but I don't have anything smaller - it's the round one I use to pipe swirls on my cupcakes). I make sure I tap my pans hard on the table before baking at least 4 times.
I use a recipe on Ladurée Sucré's book that uses the french meringue method. I usually let my shells rest for about 20 mns. they don't seem to need more than that, sometimes between batches one tray rests longer than the other, but I haven't noticed a difference with the crusts.
The macarons pictured were filled and left in the fridge for 48 hrs. before consuming them and that's when I struggled to bite into them the first time and noticed the unusually thick crust.
I'm trying a different oven tomorrow, just to rule out my oven is the problem. Hazelnut and Chocolate Macaroons sound delicious, weird that they came out like macarons though, haha.
Thank you for all your help!
Hi,
ReplyDeleteA quick question, I just tried the french meringue method and the syrup ended up hardening along the bottom of the bowl and in bits around the edge. I've done two batches so far but I can't stop it from party seizing (I'm using a hand mixer with a stainless steel bowl). How do you usually balance the pouring and mixing?
Thanks for all the helpful tutorials and recipes!
Hi Sarsie,
ReplyDeleteI use a Kitchenaide mixer so it is not a problem for me. Using a hand mixer, you will probably need some one to help you out. One person can add the hot sugar syrup very slowly and carefully without letting the syrup touch the whisk or the sides of the bowl - in a stream directly on to the meringue. The other person using the hand mixer needs to work at a medium-low speed while the syrup is being incorporated. Once the syrup has been incorporated, the meringue can be beaten at higher speed for several minutes until it has cooled down. I hope this helps,
cheers,
Corry
Hi Cory,
ReplyDeleteAfter reading your blog, i've successfully made a batch of good macaron. Thanks a lot for you helpful information. However, I've been facing a same problem recently with the macaron feet. The Macaron feet looks broken but it's still attached to the shell.
The brown macaron in this photo is the example :https://www.facebook.com/photo.php?fbid=1406568809576569&set=pcb.1406569036243213&type=1&theater
I've been researching online and not sure this is called feet bursting? Is this because the oven temperature too high?
Thanks in advance.
Thank you for this wonderful post! Your macarons look so adorable. I’ve been preparing to make macarons for the last week! Yesterday, I bought all my ingredients, but today I realized that I didn’t have a piping bag or the tips. Since today is Christmas, all the stores are closed and I can’t run out to get any. Any tips? No pun intended ;)
ReplyDeleteCan you please post the recipe for the "Spanish" method? The link is no good and I can't find any info on this at all so I don't know what the proportion changes would be. I thought you might be referring to the Swiss method but that is cooked and you are saying the Spanish one is just a sugar and bake temp change and that is not what the Swiss method would be.
ReplyDeleteHi Aubrey, I have posted the recipe for you. You will also have to visit this above blog on Macaronage for the rest of the method. Cheers, Corry
DeleteThis comment has been removed by the author.
ReplyDeleteI've heard that macaroons can be tricky to get right, so I'm glad there's a guide like this around to help make perfect ones!
ReplyDelete